
Workshop – Building a Laptop Mount
In 2004, I decided that I needed a laptop mount for my car, so I could surf the net and watch movies while I drive. Oh yeah, and watch a GPS screen. At the time I was driving across the country a lot, so my GPS was being extremely useful during this time. The only problem was that I had to set my laptop on the passenger seat, making it hard to see since it was always slipping around.
So I look for laptop mounts on the net and find them selling for hundreds of dollars. I think one was close to $1,000. On Ebay it was better, but not much. About $200 for a laptop mount. Then I saw an Ebay auction that showed you how to build your own laptop mount with pipe fittings for $2. So I purchased it and was sent a PDF file, telling me which pipe fittings to buy. I realize I could have just figured it out myself, but it was nice to have them tell me the exact measurements of pipe fittings I would need.
Even though I lost the original instructions for building one of these, I’m going to try and pass along the knowledge anyway. Everything I needed was found at my local hardware store. The pipes used are 3/4″ gas pipes. The total cost for my materials was about $20 and it only took a couple of hours to put it all together.
 |
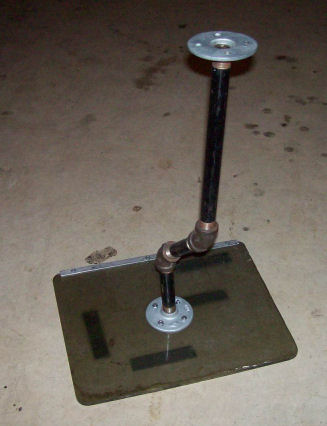 |
| Click on this image and you’ll see that you need a 3″ pipe, a 4″ pipe and a 10″ pipe. | I think the joints are 45 degrees. Maybe less? I guess it really doesn’t matter, though |
 |
 |
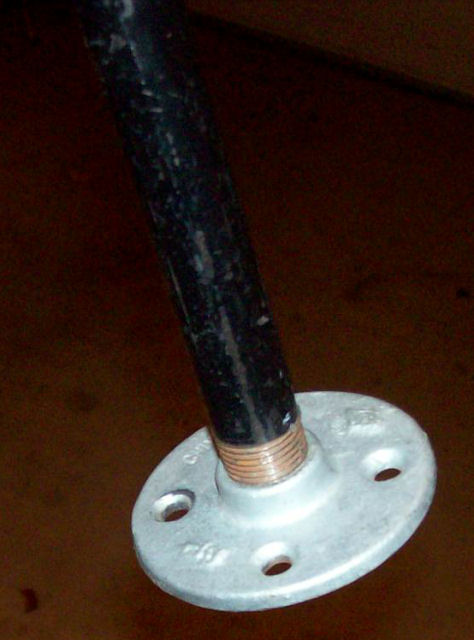
| On each end is one of these things. I have no idea what it’s called, but it was right next to the gas pipes at the hardware store. | Here’s what it looked like, completely finished. |
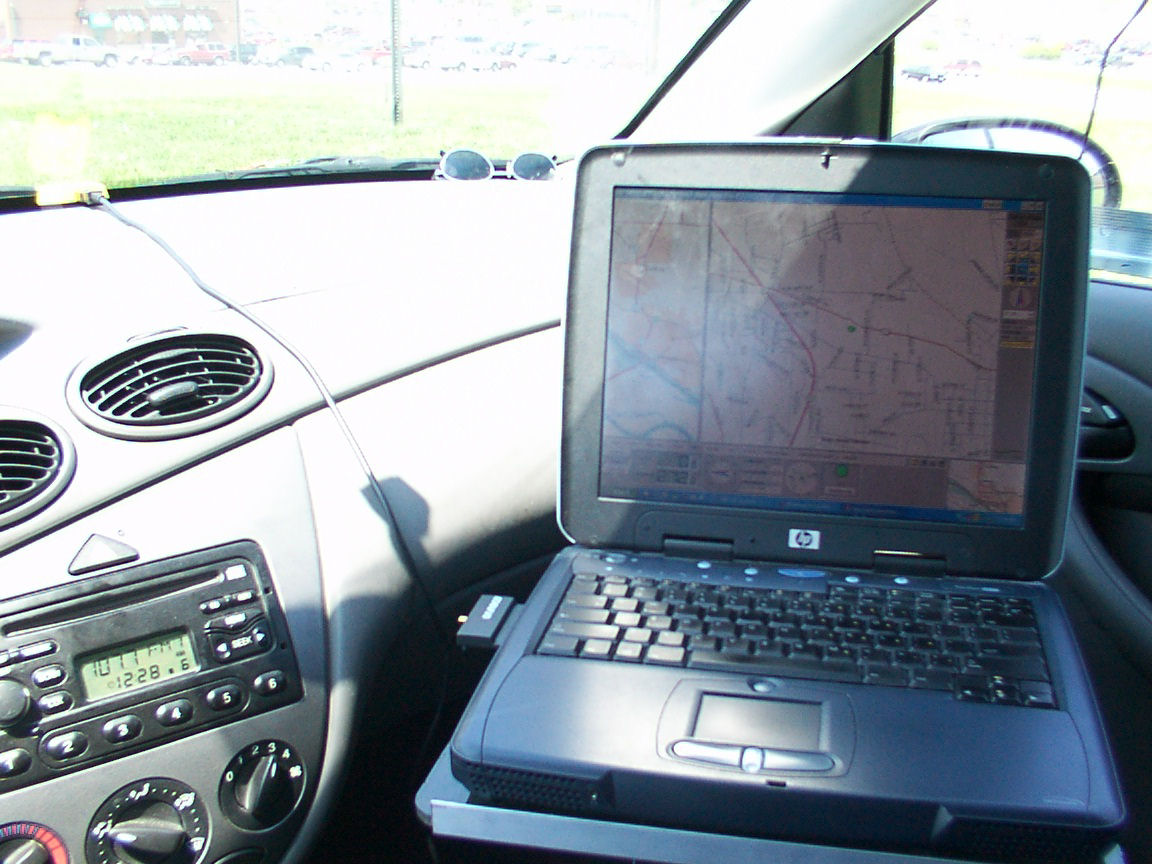
The plans I was sent suggested using wood for the top. The ones I saw on Ebay for $200 used metal on the tops. I decided to rebel and used fiberglass instead, mostly because I happened to have some in my basement. I cut a piece that measured 13.5″ by 11″ which is just slightly larger than my laptop. I rounded the corners with a jigsaw and drilled 4 holes in the middle to mount the pipe.
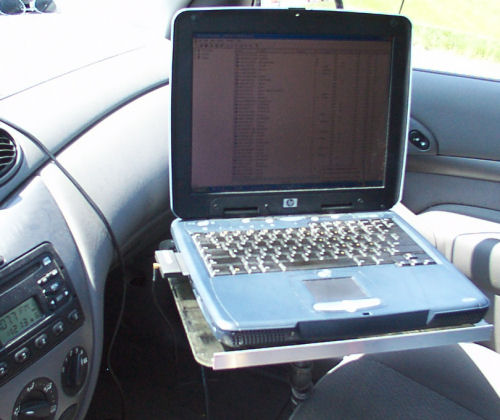
The metal piece along the front is meant to keep the laptop from falling off while you’re driving. I don’t know what that’s called either, but I found it at the hardware store and it only cost a few bucks. I also stuck some velcro strips on the fiberglass and matching strips on the back of the laptop, just to make sure it didn’t fly around the car while I was driving.
My plans suggested mounting the bottom part on a heavy piece of wood that would sit on the floor. But that didn’t seem like it would be very sturdy to me, so I actually drilled some holes into the floor of my car and mounted it to the floor. The screws stuck up about an inch from the floor but were only visible if the seat was all the way back. The laptop mount attached to the screws with wingnuts, so I could easily install and remove it.
And that’s pretty much it. A person can still sit in the passenger seat if they’re not too fat and don’t mind being stabbed by the sharp edge of the metal piece along the front. (Someday I’ll round the corners on that piece.) I still use my homemade laptop mount whenever I take long trips where I’ll need my GPS. It’s also nice for when I make stops and need to check email or whatever. And before I got a Pocket PC, the kids and I used it for Geocaching all the time.
If you decide to drill holes into your floor, BE CAREFUL! There are things under the car that you don’t want to drill holes into. The gas line, for example. The holes I drilled were just a few inches from some important-looking tubes that ran into the engine. I had to measure carefully to avoid drilling into them.
Another semi-related project was my laptop DESK for the car. Before taking the kids on a cross country drive, I thought it’d be cool if they had a TV and their Playstation 2 in the car for the 3 day drive. So I removed the passenger seat and mounted a desk that I built into its place. Here’s a picture of it…
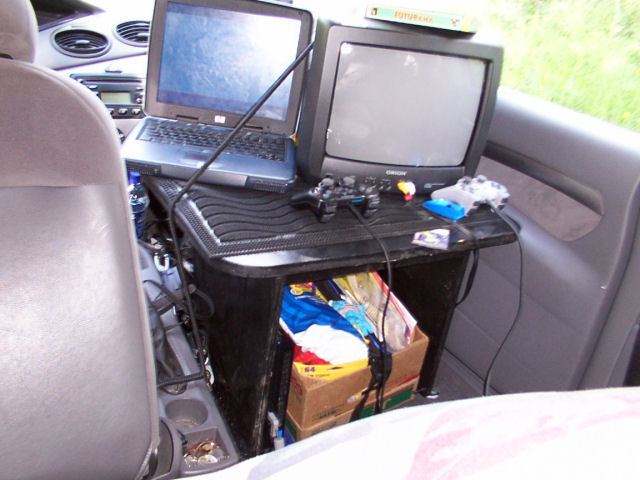
It wasn’t too hard to build. The toughest part was making sure the top part was level, which wasn’t too easy since the four corners were all at different heights. I painted the whole thing black and purchased a black rubber welcome mat and stuck it on the top to keep the TV and laptop from sliding around while I drove. I also used bungee cord to secure the TV in place. Along the bottom of the desk, there were brackets that fit over the mounting holes for the seat perfectly. Underneath was nothing but space, so the kids could store their PS2 and other junk.
The best thing was the strange stares I got from passing motorists and the comments from drive-thru people who almost always had something to say about it. It’s probably a good thing cops never noticed this. Since I could technically see the TV as I drove, it was probably illegal.
Hey, are you available to redo the propane lines throughout my house?
Thanks for making more car crashes possible
I wish I had the time to slap you with the welcome mat the t.v is sitting on.
Jesus Christ give this guy a break, I’m a patrol security officer, and easy plans to make my own mount is great. it’s not always for use when we are driving, I use it when I’m idiling in my vehicle on a post.
When did ya buy that laptop, Brad? 1995?
Is the velcro on the laptop really enough to holt it firmly in place. I would think you would need to strap it down to be very secure
Velcro holds it just fine for me. In fact, I have a hard time peeling it off sometimes.
Hey rbcp, Nice mount. I unfortunately already purchased a cop-like laptop mount from a local police supply store. I wish I saw this before hand.
i made a similar one in ’01, but i drilled into the floor of my old jeep cherokee — the power windows didn’t work for a day, but then they worked fine.. never looked into it. :)
That’s pretty awesome. I’m borrowing some elements of the plans for my own, just wanted to say thanks.
Well this is why our insurance rates are so high and the highway patrol has to have the coroner onsite many times. A TV on a welcome mat? No straps? Am I the only one seeing the propulsion effect that’s coming along soon? You need to house the TV in a bay that’s part of the cabinet then strap it in. The laptop mount is, of course, a way to get out of paying for a real mount and is going to be the demise of your laptop, windsheild and possibly someone’s face. It needs a strap not velcro and it needs a brace as the flange is not going to hold. Too much force at top for a 4″ flange. Get 2 U bolts and some electrical thinwall conduit. Flatten the ends of the conduit, drill a hole to mount one end on the hump and 2 in the other end for the U bolt. Put the U bolt around the piping about 2/3rds of the way up or even closer to the laptop. Take the other conduit and do the same but mount it under the dash to the firewall and to the pipe. I bought a surplus Gamber Johnson with an 8″ flat plate and still needed to brace it for vibration and steadiness.
As to the comments about not having a screen in the front seat – CLOSE the lid when you drive after you set the power settings to NOT do anything when the lid is closed. The backlight will go off but the machine will still run properly and when you stop and open it the backlight comes on and you can continue.
No need for a cellular card – get a GPRS capable cellphone with bluetooth. Get a bluetooth dongle capable of Bluetooth DUN. Pair the phone and laptop BT then insert your carrier’s data connect number. Call your carrier about getting a data plan for your phone but dont mention tethering the laptop or they will try to sell you a card. My ATT unlimited data plan with 200 text messages runs $20 extra a month and I make that back in being able to work from anywhere.
Just do this home build stuff with the worst conditions in mind – just because it’s sturdy in the driveway doesnt mean it will work at 75 mph on the interstate or in a panic stop or even an accident. Nothing like having to explain to a judge/coroner/yourself why your 10 yr old died in a minor accident due to a TV smashing him/her in the head.
hey, can u send me some pics of the way that u mounted it to the floor. i wuld like to see that, im trying to make a mount for my car too. thanks. msg me back for my email. thank you.
It’s about time someone tries to save a buck and uses there head rather than flushing 200 bucks or more down the toilet. Just a suggestion may want to run a second support leg for big truck applications. As far as your critics I wonder how many of the critics hold there cell phones up to there ear while driving. And why are they looking for a site for plans to mount a laptop??? Are they really just that bored or are they just looking for something to cry about??? Ignore them and thank you for trying to help out your fellow citizens and save them some money.
I think this is an excellent idea! Being a security officer myself, it’s unnerving and interfering to have a laptop sitting in your lap when you have to run to an emergency. Having this mount makes it easier to just start the car and take off. Before, I had to put the laptop back in the passenger seat and adjust the driver seat to where I could reach the pedals and go.
GOOD IDEA DUDE!!!
allready had one and they are great! very secure (if you also use velcro straps across the top to secure the laptop to the table is even better) and convenient. i’m a mobile computer tech in los angeles and orange county and i can rave on this all day.
At the lower, floor mount flange add a quick disconnect for ease of moving mount in an out of vehicle when needed.
I like your laptop stand. I’m disabled, low income and cannot build it. Can you build one for me?