
Replacing my 360 Systems Instant Replay SCSI Hard Drive With A Memory Card
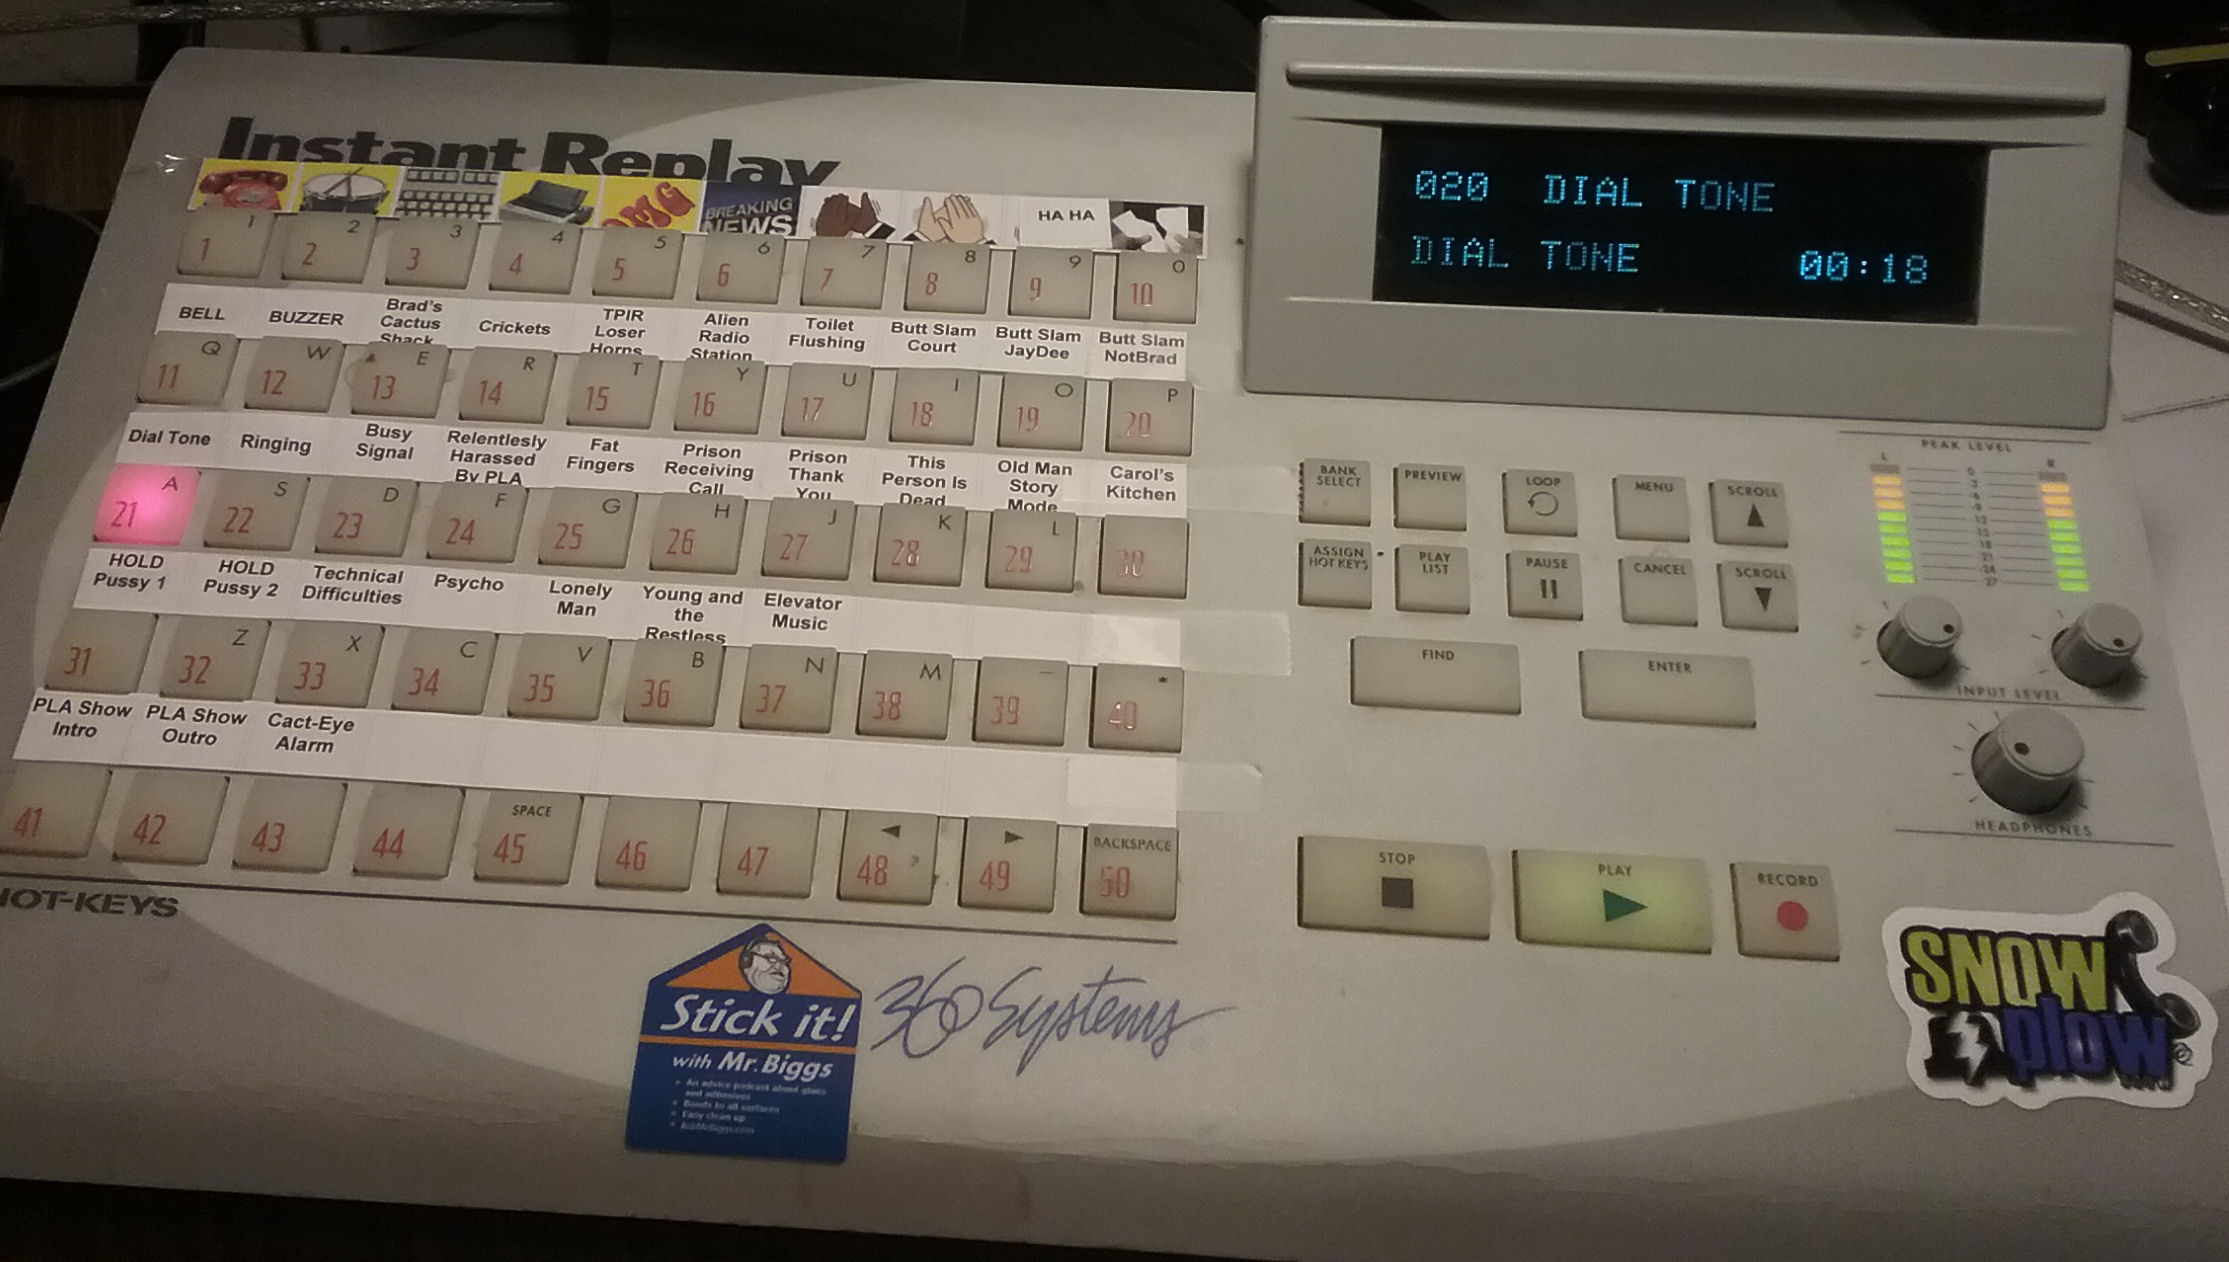
Earlier this month a very generous listener of The Snow Plow Show was nice enough to send me a sound board machine. It’s called an Instant Replay Hard Disk Audio 2.0 and it’s manufactured by 360 Systems. I’m told that radio stations across the country used these to play sound clips and promos during the 1990’s and early 2000’s before upgrading to something new.

It’s an awesome machine and works great. The buttons have an instant response time which is a nice upgrade from the Android tablet and soundboard app I’ve been using for years. This thing will make doing live shows much easier for years to come. The only problem with my 360 was that the hard drive wasn’t sounding too good. It made a high pitched noise the entire time it was running, which could be heard while recording shows. It also clicked loudly at every single button press. It seemed likely that the hard drive could die at any second.
Since the 360 was made way back in the 1990’s, finding a replacement drive for it wasn’t going to be cheap. The 360 uses a SCSI interface which, as far as I know, isn’t in use anymore except in really old machines like this. The documentation for the 360 wasn’t very clear on how big its drive was allowed to be, so if I purchased the wrong size, it might not work at all. I opened the 360 and looked at the drive, but the size wasn’t listed on the drive anywhere.
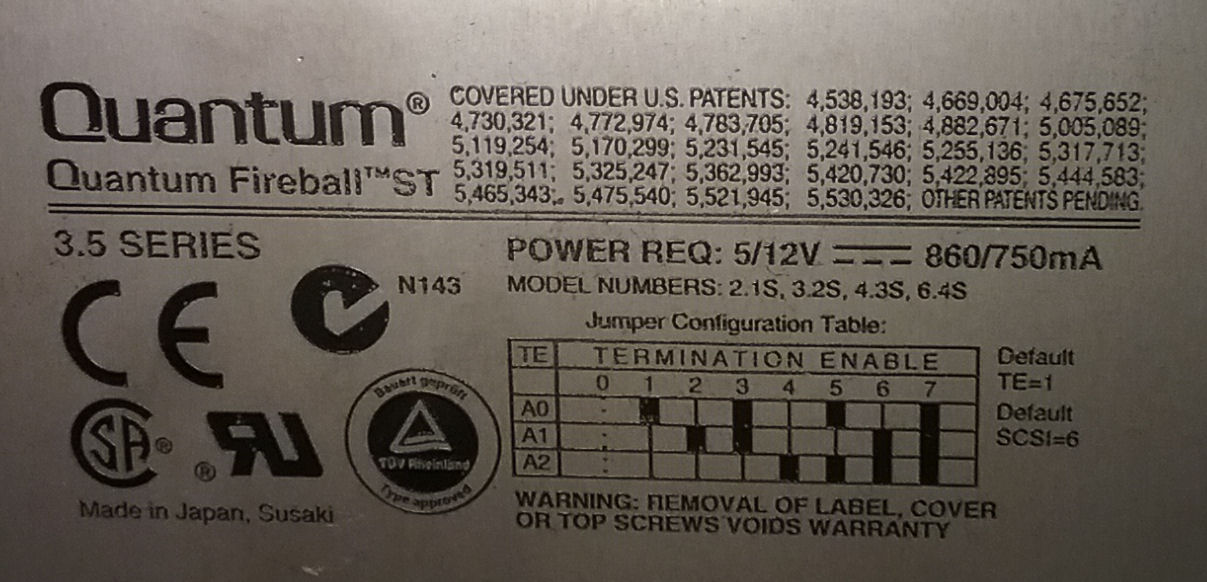
All the label told me was that it was a Quantum Fireball ST drive and that it was one of four model numbers: 2.1S, 3.2S, 4.3S, or 6.4S. I assume those are drive sizes, but it doesn’t tell me which drive this actually is. Some online searching found that Fireball hard drives were sold in those sizes. A 2.1 gig drive on eBay can go for over $150. Other SCSI drives are cheaper, but again, I don’t know how finicky the 360 is about sizes.

I counted the pins on the drive to find out that it was a 50 pin SCSI connector. I thought it might be easy to find a SCSI to IDE/SATA converter so I could try random sizes of old drives I have lying around the house, but that didn’t seem to be something that was available.
In the end I took Mr. Bigg’s advice and decided to try a device called the SCSI2SD adapter. It’s a circuit board with a 50 pin SCSI connector on one end and an SD memory card on the other, effectively tricking the 360 into thinking an old SD card is a SCSI hard drive. From what I could see online, a lot of people use the SCSI2SD card to keep old music samplers alive. I couldn’t find any mention of using one on a 360, but since I could define the size of the drive on the SD card, it seemed likely to work. And it did! Below I’m going to detail the installation process. Here is a picture of the SCSI2SD card I purchased.
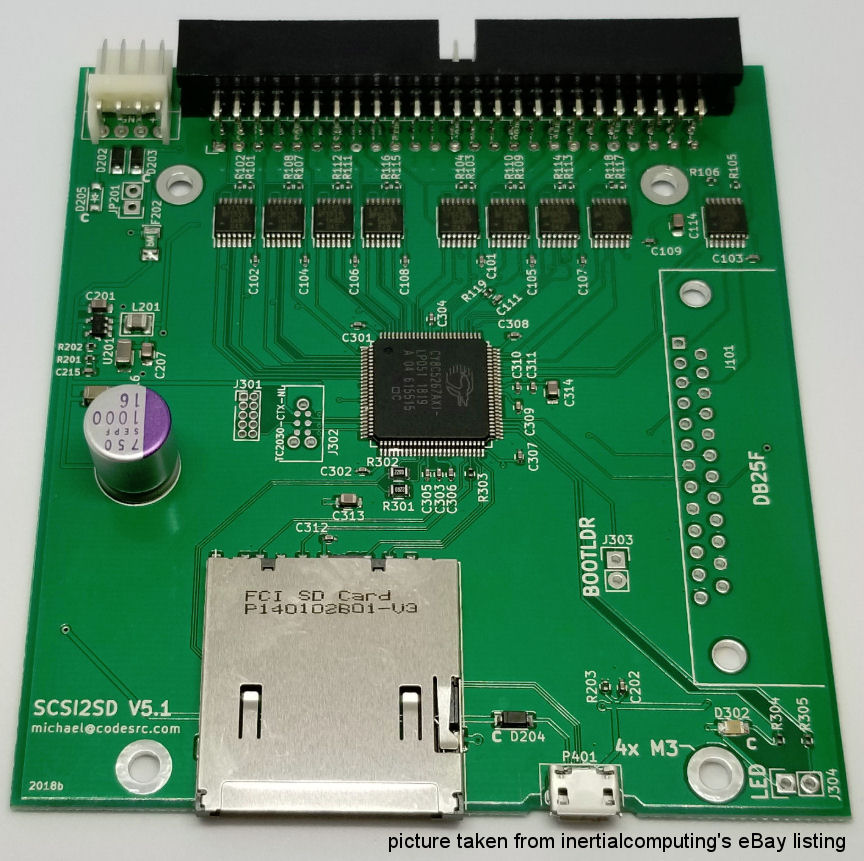
I got my SCSI2SD from an eBay account called inertialcomputing. It’s version 5.1 – there is a newer version, but this one was less than $80 and seemed like it would work just fine, so I picked it. It even came with an 8 gig SD memory card. You might notice it has a weird power connector. That’s an old floppy drive connector. Since the 360 uses a standard Molex power connector, you’ll also need to buy a 4-Pin Male to Floppy Drive 4 Pin Power Adaptor Cable. It looks like this, and you can probably find one on eBay.
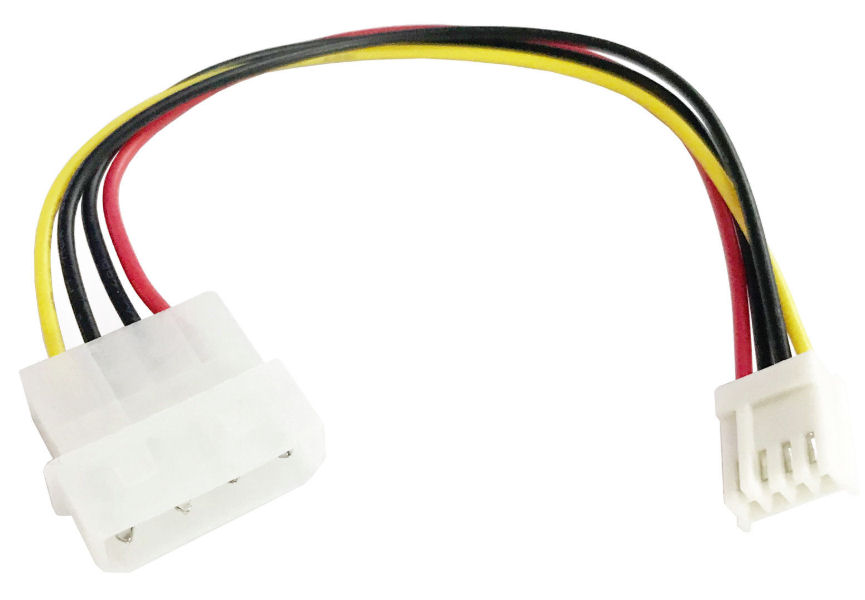
STEP 1: Something very important to know about the SCSI2SD board is that it runs on just 5 volts. According to their website, if you try to connect 12 volts to it, it will burn out the main chip. It makes me wonder why they even have the 12 volt pin wired up. Maybe they don’t and people just accidentally wire them backwards. In any case, cut the yellow wire off of that Molex-to-floppy cable, just to be safe. The yellow is 12 volts and the red is 5 volts. You don’t need the yellow and it could melt the board, so CHOP IT OFF.

STEP 2: Download files for your SCSI2SD. I was naive and hoped that my SCSI2SD board and SD card would work straight out of the box. I was wrong. You have to download a utility that connects to your SCSI2SD card, a bootloader, and a firmware update. The version numbers are confusing. I bought a v5.1 SCSI2SD card, but the verison numbers currently only go up to v4.8. That’s the one you would use for the v5.1 card. Unless, of course, they’ve released a newer version by the time you read this. (I’m writing this in mid-2018) Go into the directory and get whatever is the latest one.
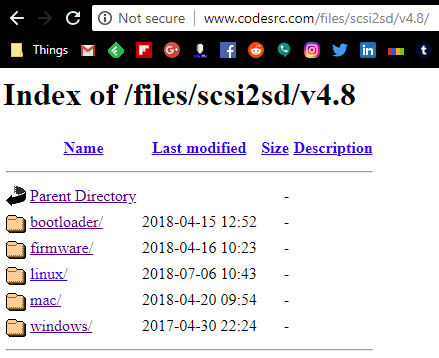
You’ll want the utility program – scsi2sd-util.exe in the Windows directory, or scsi2sd-util.dmg if you use a Mac. The monitor program didn’t seem necessary and I didn’t use it for anything. Also grab the latest firmware file from the firmware directory and the bootloader files from the bootloader directory. I’m still confused about which bootloader files you need, so I took all three of the v5.1 files just in case – SCSI2SD-V51.hex, USB_Bootloader-V51.elf and USB_Bootloader-V51.hex.
STEP 3: Prepare your SD card. Put it into your computer and make sure that it’s formatted as a fat32 drive. Copy your three bootloader files onto the card. You probably don’t need all three files, but I put them all on there and it works, so don’t question my instructions. Just do it.
STEP 4: Install the windows software by clicking on the exe file. Once that’s done, insert your SD card into the SCSI2SD board, plug in a USB cable from your computer to the SCSI2SD card, and run the utility software. If all goes well, you’ll be connected to your SCSI2SD board.
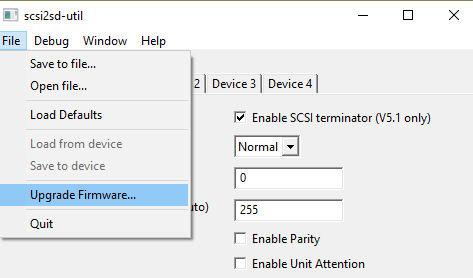
STEP 5: Update the SCSI2SD firmware. Under the “File” heading there’s an option to update the firmware. Do that. It’s easy. Now your card works.
STEP 6: Set up your virtual SCSI drives on the SD card. The only way I could get this thing to work on the 360 was to create two virtual hard drives instead of one. The 360 seems to ignore the first drive and uses the second drive. There is probably an easier way to do this and I could probably make it work with just one drive if I knew anything about SCSI. But I don’t, so we’re creating two virtual hard drives.
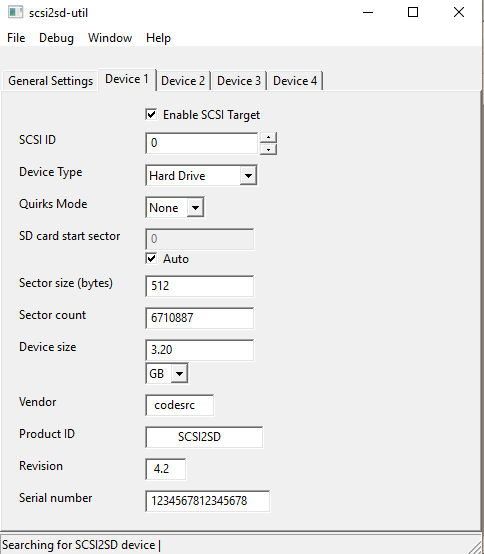
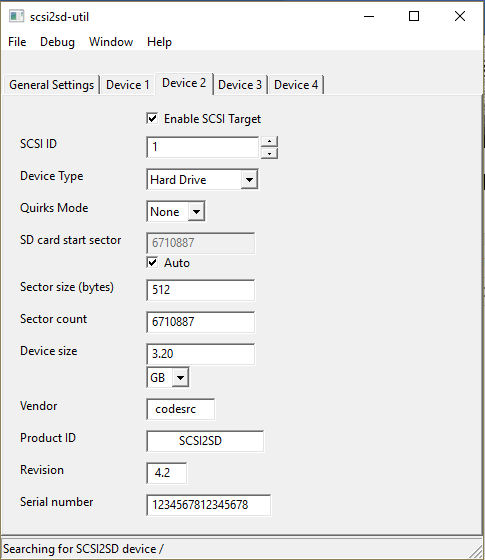
Using your SCSI Utility, go to the Device 1 tab. Check the box that says “Enable SCSI Target.” Your SCSI ID is 0, device type is Hard Drive, no Quirks, Sector size is 512, and device size is 3.20 GB. You’ll want to check the “Auto” box on SD card start sector.
Now go to the Device 2 tab. Check the box that says “Enable SCSI Target.” Your SCSI ID is 1, device type is Hard Drive, no Quirks, Sector size is 512, and device size is 3.20 GB. You’ll want to check the “Auto” box on SD card start sector.
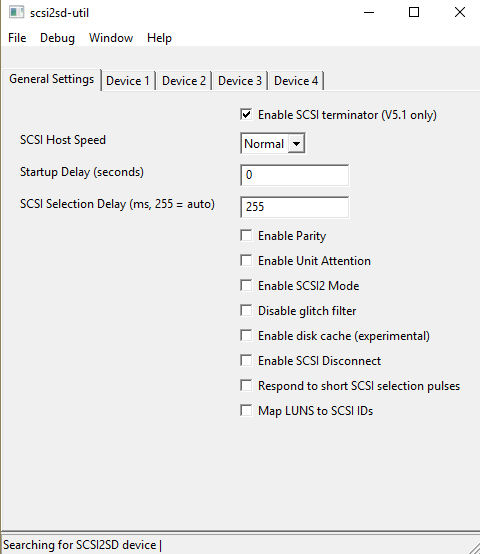
Leave devices 3 and 4 alone. Go to the General Settings tab and leave everything exactly how it was. The “Enable SCSI terminator” should be checked. Host speed is Normal. Startup Delay is 0. SCSI Selection Delay is 255. All the boxes under that are unchecked. Below are pictures of what each of your three tabs should look like.
Once all of that is done, go to the File heading and select the option that uploads your changes to the SCSI2SD card. If it gives you the confirmation message that it worked, then you are ready to install your card into the 360. If you get an error, don’t panic. That happened to me a few times. I had to retry and it worked the second time. If you keep getting the error, maybe try a different USB cable or a different USB port.
A note about hard drive sizes – when I first tried this, I set my first drive size to .25 because it wasn’t used and my second drive size to 7 gigs, thinking I would get a bunch of extra space to record things on. It seemed to work, but then I was getting drive errors on the 360. It’s probably best to stick to the standard drive sizes that are written on my 360’s actual hard drive. Those sizes are 2.1, 3.2, 4.3, and 6.4. It might not even be able to go as high as 6.4 gigs. I stuck with 3.2 gigs on each drive it seems to be working great so far. Maybe you can get more space by doing 2.1 gigs on the first drive and 4.3 gigs on the second drive. All I know is that 3.2 gigs on each drive works for me and I have no idea what the actual size limits are.
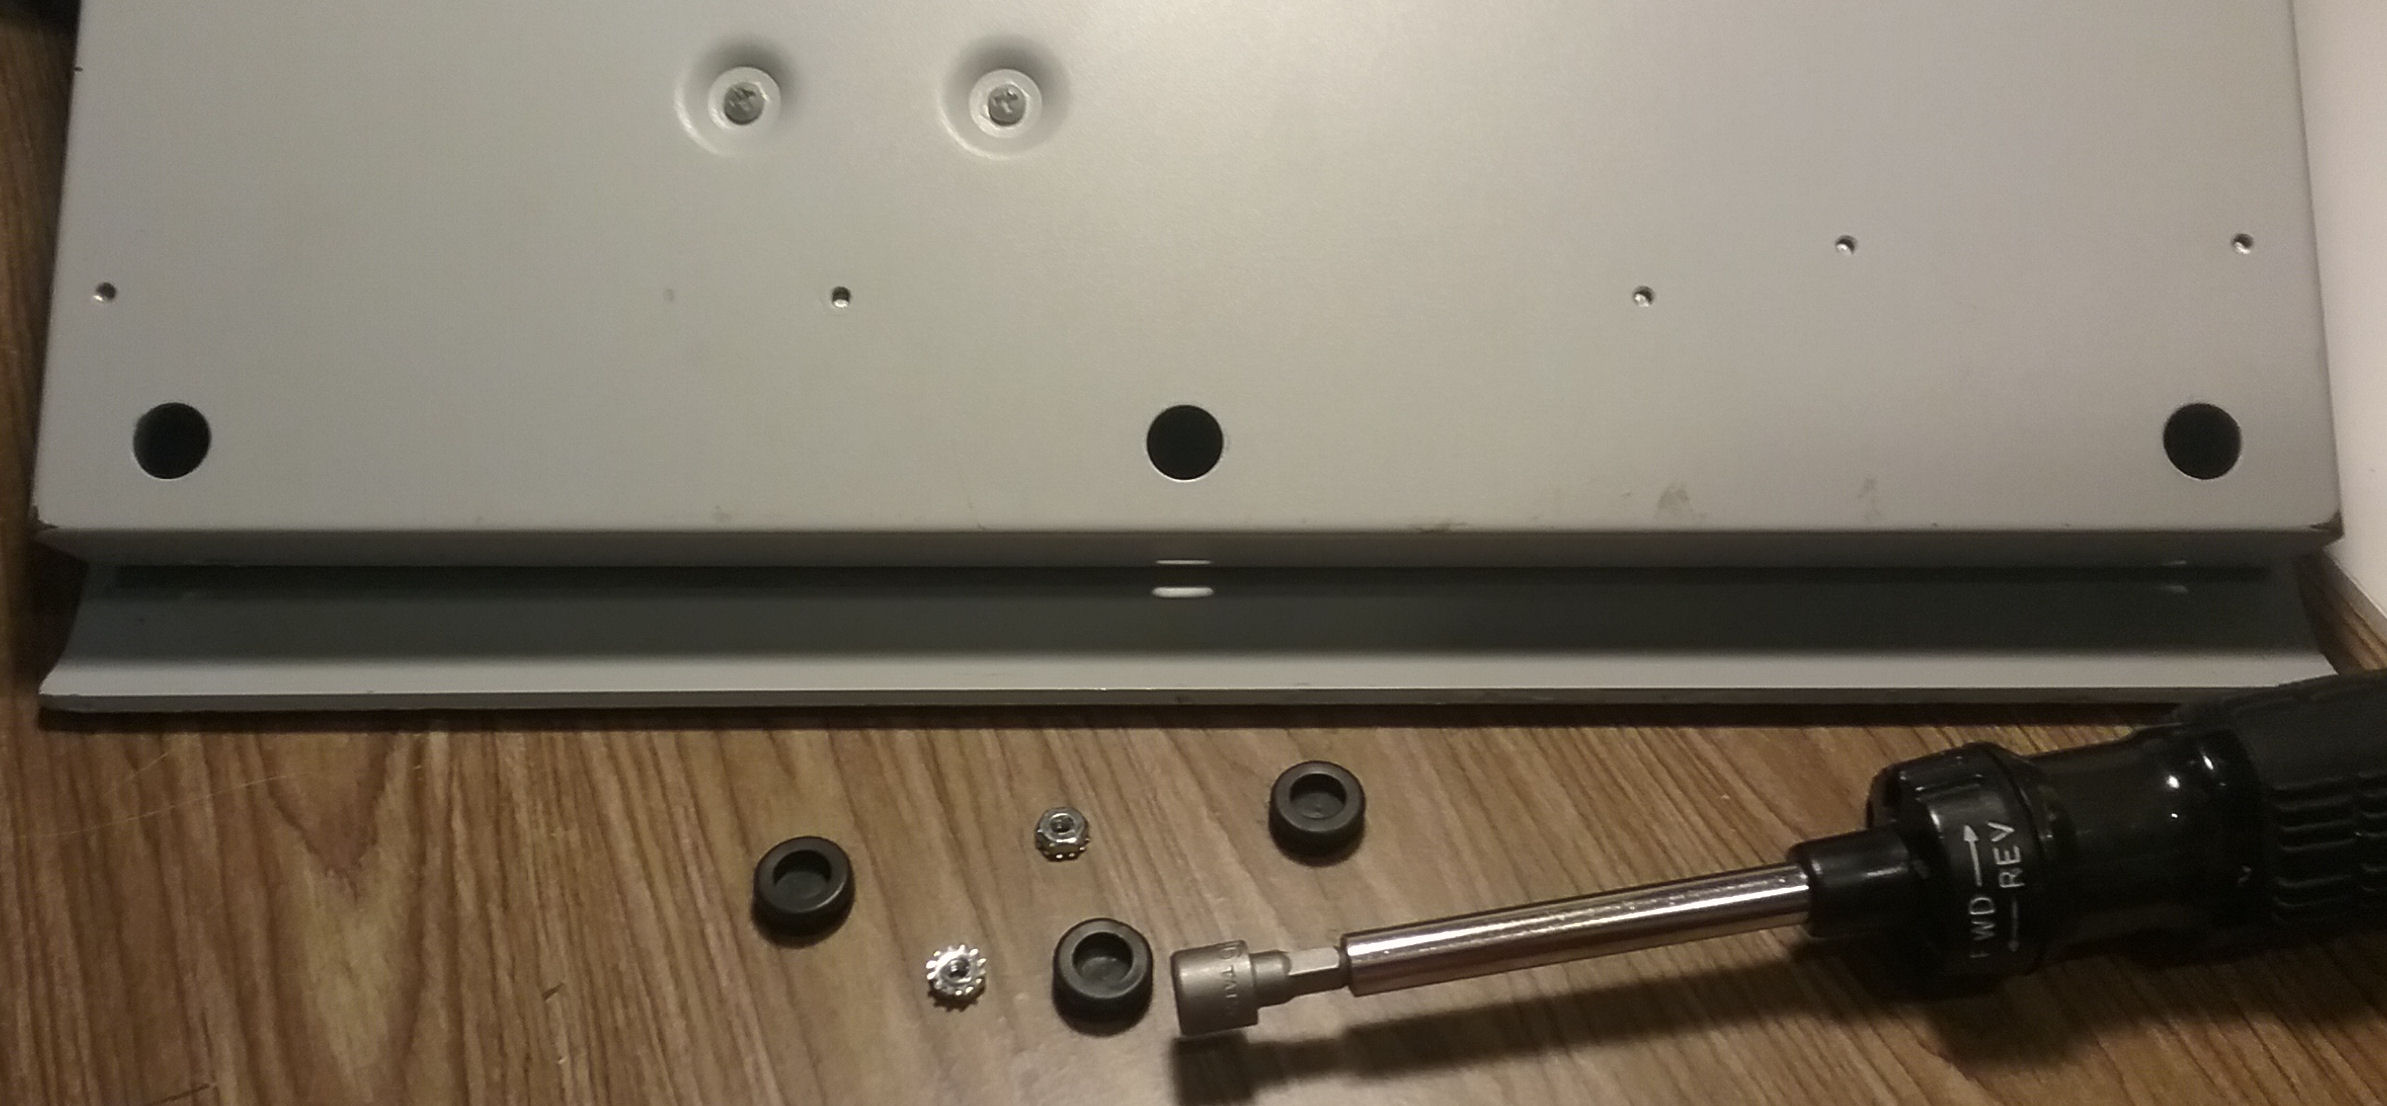
STEP 7: Take apart your 360. Disconnect the power and audio cables, obviously, dummy. When you turn it upside down, you’ll see five circular rubber feet – two in the back and three in the front. Remove the three in the front with a screwdriver. Stick a 5/16″ socket driver into each of the holes and remove the nuts inside. Good luck happening to own a 5/16″ socket driver that actually fits into these holes. Two of mine didn’t, but the third one I found did. It seems like it’d be really easy to lose your socket driver inside one of these holes. Be careful.
Once that’s done, turn the 360 back upright and take the lid off of it. To do this, slide the lid all the way toward the back as far as possible, lift up the bottom part of it and then pull it down. If that doesn’t work just jiggle it all over the place and figure it out yourself. There are four cables connecting the lid to the circuit board. Disconnect all four of them and set the lid aside. Now gaze into the beauty of that that 1990’s circuit board with all the chips lovingly labeled and spaced apart. You just don’t see craftsmanship like this anymore.

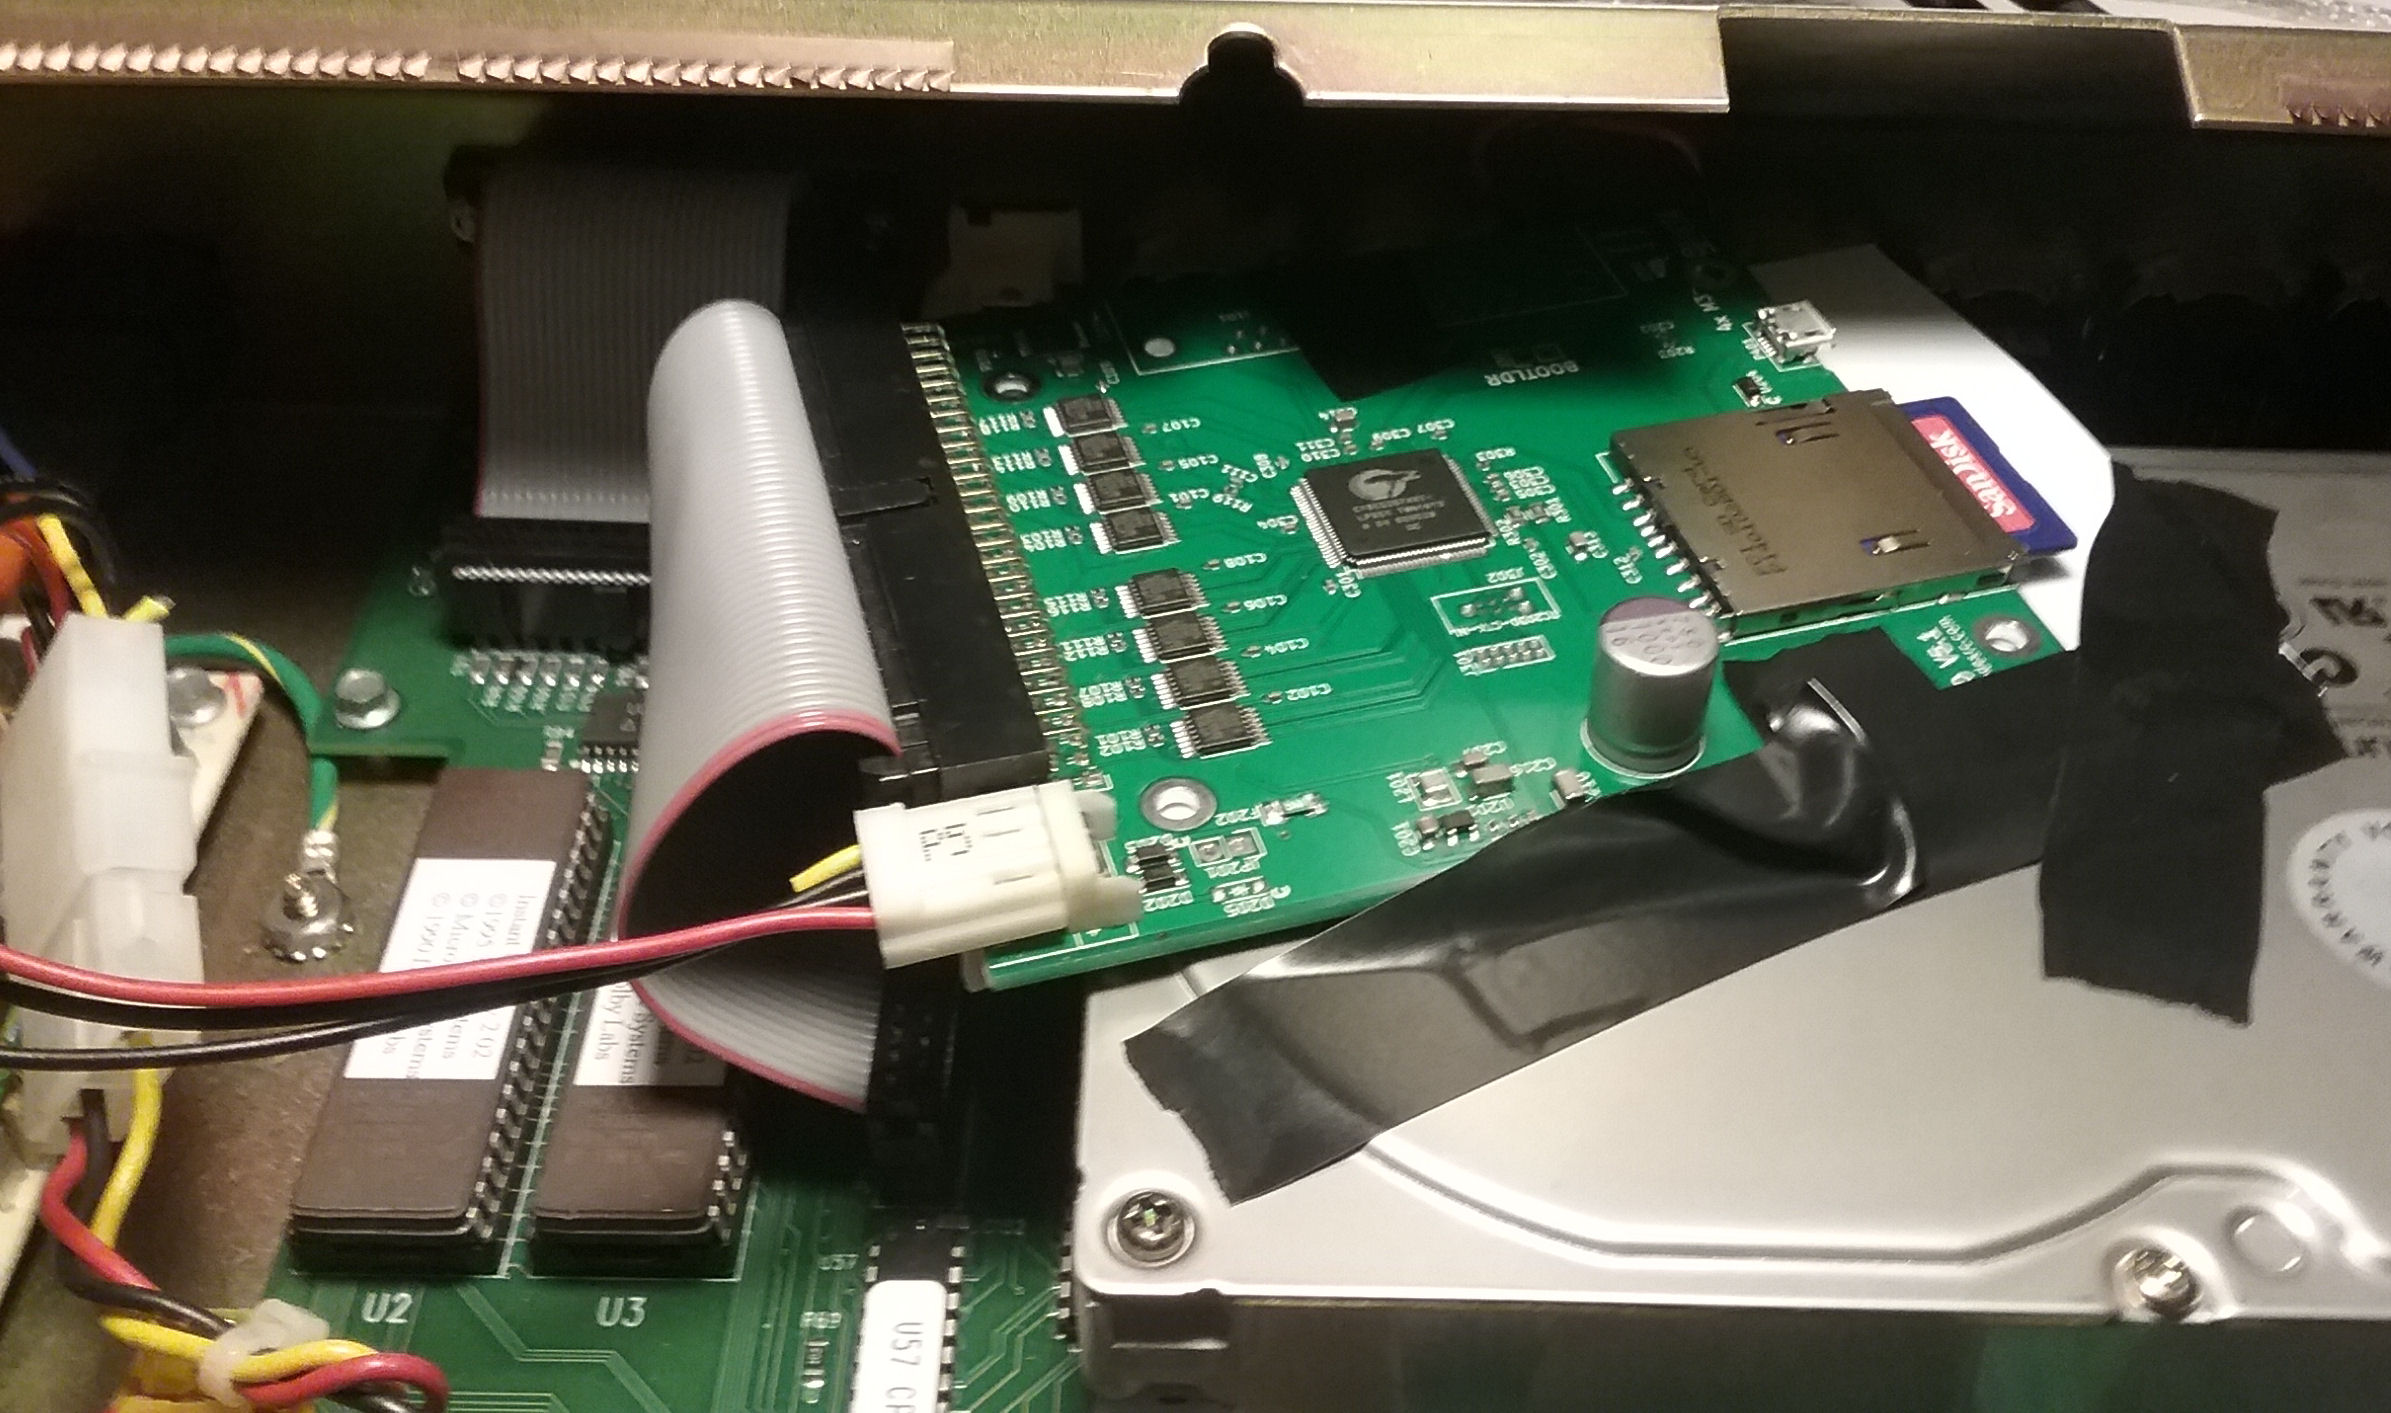
STEP 8: Remove the hard drive. Or Don’t. I left mine in there and just set the SCSI2SD board on top of it, separated by a thin piece of plastic. The holes on your SCSI2SD card aren’t going to line up with the holes on the hard drive, so you’ll have nothing to mount it on unless you buy a 3.5″ kit for your SCSI2SD card. Unless you have a better plan, just leave the old SCSI drive right where it is. If you want to remove it, the mounting screws are located on the bottom of the 360, making it awkward to remove. The rest of these steps will assume you left it in there.
STEP 9: Connect your SCSI2SD card to the 360. Remove the grey SCSI cable from the old SCSI drive and plug it into your SCSI2SD card. Remove the Molex power plug from the old SCSI drive and connect your Molex-to-floppy adapter cable. Make sure you’ve cut the yellow wire completely off of the adapter cable so you don’t accidentally send 12 volts into your SCSI2SD card, making it explode like a bomb. Plug the floppy connector into the SCSI2SD card.
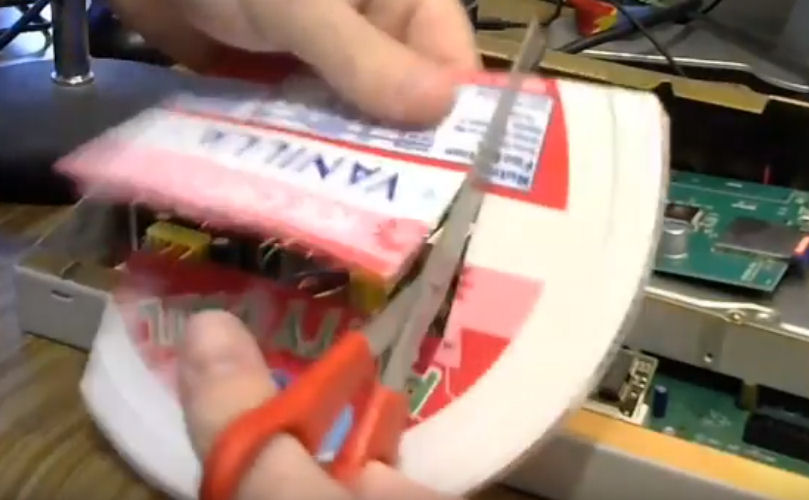
Your SCSI2SD card will sit on top of the old SCSI hard drive, but you don’t want to have the metal pins underneath it touching the metal hard drive, so you need to insulate it somehow. I cut up a plastic lid from a container of ice cream into a SCSI2SD shaped rectangle. I taped the plastic onto the bottom of the SCSI2SD card. Then I taped that onto the hard drive.
You’ll notice I taped it at an angle instead of squarely in the middle of the old hard drive. This is because of that one capacitor sticking up on the SCSI2SD card. It sticks up enough that it might get crushed when you put the lid of your 360 back on. So just to be safe, it’s at an angle and looks very unprofessional. It’s okay, nobody will ever see it. Look at that tape job. I didn’t even try to make it look nice.
STEP 10: Put the 360’s top back on. Connect the four cables that you unhooked and place the lid back where it belongs. Don’t bother putting the three screws back in yet. Chances are something won’t work right and you’ll have to get back in there to tighten a cable or put out a fire caused by a plastic ice cream lid heating up and catching on fire. Connect the 360’s power cable and turn the unit on. If all goes well it will boot up and you’ll be greeted with a message on the screen that says WRONG DISK FORMAT – SELECT INT DRIVE?
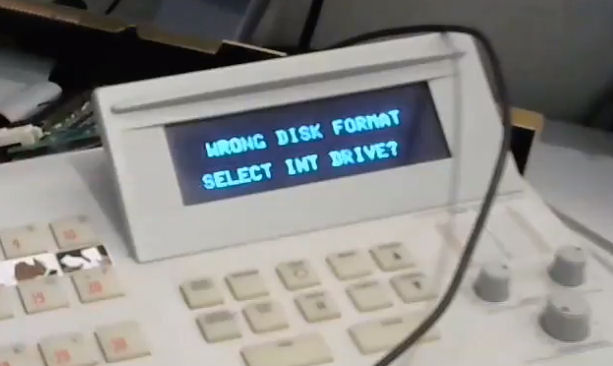
That is a good message to see! This means that the 360 is seeing your fake SCSI hard drive, but it still needs to be formatted. This stumped me for an hour until I looked at the 360’s manual and found out that I needed to format. To format the drive, turn the 360 off. Press and hold down the STOP button and turn the 360 back on. Keep holding the STOP button until you see a message that states PRESS PLAY TO FORMAT PRESS CANCEL TO QUIT.
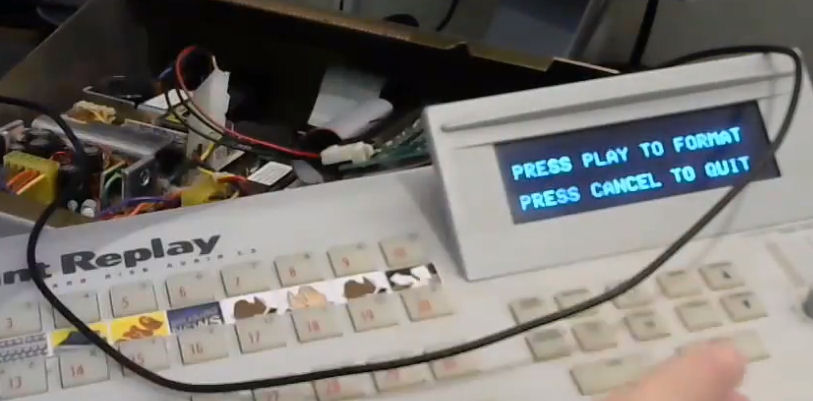
Press the play button and wait for the disk format to complete. For my 3.2 gig virtual drive it took around five minutes, so be patient and let it finish. Once it’s done it’ll flash your version number, a 1990’s date, a hilarious message about how much RAM we used to use in computers, and you’ll see the message NO CUTS AVAILABLE on your screen. Congratulations, your 360 is now ready to use!
Record some cuts and make sure it works. Once you’ve confirmed that it’s okay, it’s safe to put those nuts back into the bottom of the machine. Hopefully you taped your SCSI2SD card down better than I did mine. Good luck getting those nuts back on because it’s nearly impossible to do. For best results, magnetize your 5/16″ socket driver. My solution is just to never put them back in there.
STEP 11: Back up your SD card! Once you’ve added a bunch of sounds to the machine, it sure would suck if you lost all that work. The SD card isn’t readable by Windows, so you need to use an imaging program to copy the entire card into an .img file so you can restore it someday if you ever need to. This tutorial one howtogeek.com told me to use a Windows program called Win32 Disk Imager which worked great. Besides keeping a spare image on my computer, I taped a spare SD card backup inside the machine.
As I mentioned, the SD card isn’t readable by Windows, so the card will look empty to you, but your saved files are in there. It sucks that you can’t just see the files and upload new WAV files directly to it, but I guess that’s not possible.
I hope this tutorial has helped you. I spent hours getting this all to work for myself so I hope this page has helped you complete your conversion in considerably less time than it took me. Now it’s your turn to help me if you can. I have some questions about the 360 that I wouldn’t mind getting answered.
QUESTION #1: How do I upgrade the firmware on the Instant Replay 360? I can’t find an answer to this anywhere. Currently my unit is at version 2.014. I know that if I had version 2.3 I would have the extra featuring of editing my clips on the machine so I could take silences off the beginning and ends of clips and make them more loopable. Is there a place to just buy the upgraded chips?
QUESTION #2: What is the actual hard drive size limit on the 360? I played around with 6.4 and 4.3 sizes, but the available audio space seemed to be the same as when I chose a 2.1 or 3.2 size. Is it just ignoring everything over 2.1 gigs?
I hope to keep using the Instant Replay 360 for many years, so if you happen to know anything about it that would make it even cooler than it already is, please share in the comments. Below is a video I made as I installed the SCSI2SD into my 360. There might be a few extra details in the video that aren’t on this page, so if you’re stumped, try watching the video.
Thanks, Hackaday, for featuring my terrible workmanship on your website!
Thanks, Mr. Biggs, for finding the SCSI2SD solution for me! Everyone should be listening to the Ask Mr. Biggs podcast, one of my favorite comedy shows on Internet.
And while you’re at it, give my shows a listen too. I do The Snow Plow Show, Brad’s Cactus Shack, Phone Losers of America, Mr. Dobalina’s Wonderful World of Prank Calls, and Hobosodes.
For more photos of the 360, visit my Instant Replay 360 page on phonelosers.com
If I remember correctly (it’s been a decade or more since I dealt with these) the software updates were done via a chip swap. I may be confusing it with another piece of gear, but I recall doing a refurb on one and I am almost certain I did an IC swap and drive upgrade at the same time.
*. You probably didn’t need two virtual drives. More likely, you just had to match the SCSI ID of the drive that was there.
*. For mounting, a good solution is double-sided foam mounting tape.
Your questions:
1. The firmware is burned in to the big labeled chips on the main board. You’d have to replace the chips to upgrade the firmware.
2. The 360 uses its own way of formatting the disk or card. You’d have to get a hacker to figure out what kind of formatting it uses. If you get a utility like “Win32 Disk Imager”, you can copy the entire contents of the SD card to a file, and then someone can analyze the file to see how it is formatted.
If you 360 is truly a “Instant Replay 2” (DR-600), it has an ethernet port on the back and you can FTP the files from your PC to the 360 (and vice versa). But since I don’t see a “2” on the front panel, it’s probably a model DR-552 that doesn’t have that feature. It does offer a way to transfer files over the digital audio connectors, but that would also require someone to figure out how it works and make software for the PC to talk to it.
3. Size limit? I have no idea. It could be limited to 2GB or 4GB due to filesystem size limitations. The model DR-554 supports up to 5.4GB only (from the 360 Systems knowledge base).
4. Use a “raw disk imaging” utility like “WIn32 Disk Imager”. It will let you write the entire contents of the card to a single file on the PC (and vice versa).
What model 360 do you have? We have one of the older units but ours has an IDE drive in it, not SCSI.
Radiowave911 – Mine is a DR552-16. Since I’ve put this page up I’ve talked to another guy who has an IDE drive in his too. I’ve seen IDE-to-SD card converters for much cheaper. More like less than $10 than $80ish. Wish mine had been a IDE.
Brad..You didn’t mention the worst part of replacing a hard drive. You have to SAVE and copy all audio files or you lose them. Incidentally, I’m not a tech but a programmer, so I can never do this. Reading the comments regarding other problems that can also happen, I don’t think I’ll ever buy an Instant Replay!
wow! thank you very much! I have read and executed your guide for my dr550 (old model). Fantastic! Old hard disk was very very very loud. Now are very silent.
it would be nice to be able to manage the files on the sd from the pc … do you have any news?
thanks again for the guide